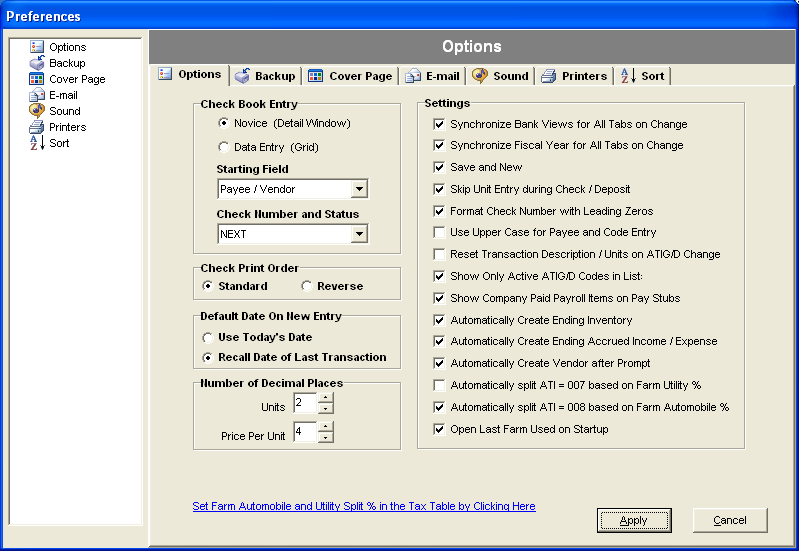
Preferences – Options Tab
Click on File: Preferences to launch the Preferences window.

The first tab within the Preferences window is the Options Tab

Check Book Entry
- Novice – Opens a popup window with the expanded ATIG code selection and unit entry window to allow you enter the check and deposit detail lines.
- Data Entry – enter the information in the grid detail line.
Starting Field
Choose a field where the cursor will start when entering deposits, checks or paychecks. The choices are Bank Account, Number, Date or Payee/Vendor. Number is a good choice when entering checks manually.
Check Number and Status
This option controls the default check or paycheck number. The options for this field are:
- PRINT and PRINT and Cleared – Uses the default value of PRINT in the check number field and selects Print for the status. The PRINT and Cleared also selects the Cleared status. Use these options to print checks in the check writer.
- NEXT – NEXT and Cleared If you have not assigned a starting check number for the bank account, the word “NEXT” will appear instead of a number. The NEXT option does not select any of the status choices. The “Next and Cleared” selects the Cleared status and will be marked indicating it has cleared the bank. These checks will not show up in the check writer and will be assigned the next check sequence number associated with the bank account. Use these options if you are entering checks from a bank statement.
- DB/CR and DB/CR and Cleared – When either of these options is selected, the check number will be defaulted to DB and CR for the check number or deposit number respectively. This is useful when entering transactions for debit or credit card records.
Check Number and Status
- Standard – Check numbers in ascending order
- Reverse – Check numbers in descending order
Settings
- Synchronize Bank Views on change – When this option is set the same bank account is used on any of the four tabs (Register, Check, Paycheck, or Deposit). When the bank account is changed in any one of the four tabs, the account is changed on all of the other tabs as well.
- Synchronize Fiscal Year on Change – When this option is set, the fiscal year can be changed for the entire application without closing the farm and opening it in a new fiscal year. The exception is the setup menu, which only allows changes to the default or current fiscal year.
- Save and New – Select this option if you want the program to automatically present a new check each time the current check is recorded. If the option is not selected you must click the new button each time to add the next check.
- Skip Unit Entry during Check/Deposit – When this option is checked the user is not prompted for unit entry when entering Checks or Deposits, unless the entry is for livestock or crops, then units are always required. Enter a “1” instead of a “0” in the unit fields when choosing to bypass unit entry.
- Format Check Number with Leading Zero – You can decide if you prefer to have the check number prefilled with leading zero or not.
- Use Upper Case for Payee and Code Entry – This option allows you to enter the payee and code entry to be captured in upper case without using the caps lock key.
- Reset Transaction Description/Units on ATIG/D Change – This option will allow the user to control the behavior when changing an ATIG/D code for a check / deposit detail transaction line.
- Show Only Active ATIG Codes in Lists – You can de-activate ATIG codes that may not be used by your farm under the Setup – ATI-ATIG Codes menu option. By de-selecting codes that may not be used on your farm, only active codes will show in the drop down menus, however inactive codes are still valid when used on transactions.
- Show Company Paid Payroll Items on Pay Stubs – This option lets you control whether company paid deductions are displayed on the pay stub (and payroll pay stub report) or not.
- Auto Create Ending Inventory – When this is selected, the program will create ending inventory records for inventory items equal to the beginning inventory values for these items.
- Automatically Create Ending Accrued Income/Expense – When this is selected, the program will create ending accrued income / expense records for inventory items equal to the beginning inventory values for these items.
- Automatically split ATI = 007 based on Farm Utility % – This preference is not set by default. Select the preference by clicking the box. Enter the split percentage under Setup: Tax Table. Choose the Add Button to create the entry in the tax table. Choose Farm Utility % as the tax bracket Type and enter the percentage as a decimal number – .8 for 80%, .5 for 50%.
- Automatically split ATI = 008 based on Farm Automobile % – This preference is not set by default. Select the preference by clicking in the box. Enter the split percentage under Setup, Tax Table. Choose the Add Button to create the entry in the tax table. Choose Farm Auto % as the tax bracket Type and enter the percentage as a decimal number – .8 for 80%, .5 for 50%.
- Open Last Farm Used on Startup – Select this option to open same farm that was open the last time you used the program when the program starts. This is useful if you have only one farm, or if you do most of your work in same farm.
